17 June 2009 |
10
comments
Photoshop Tutorial: Cut Out using Pen Tool
Hi all, actually this is the part of the tutorial how to make this image that i'll post in TheTuts. How to cut a photo using the  Pen Tool (sepang, ehem..ehem..).
Final Result
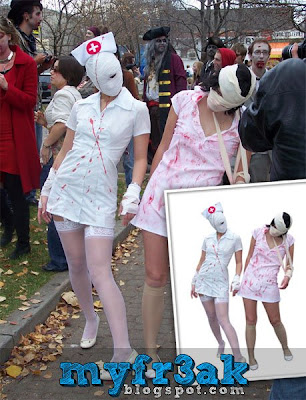
Original Photo - Here (by thivierr)
Step 1
Click Pen Tool on the toolbar, and make sure you click on the Paths,Add to Path Area (+) just like the image.

Then, draw the outline of the image using Pen Tool.

Step 2
Here is result when you're finish drawing the outline of the image.

Right click on the image (still with your Pen Tool), click Make Selection

and here is the result of the action (make selection).

Step 3
Create a new layer of the selection image. Go to Layer > New > Layer via Copy

After put white background behind the layer that we've create and hide the original layer, this is the result.

Yes, it still not perfect right? As you can see, the should of the right ladies still covering by black coat and we'll fix it later.
Step 4
With the same technique, remove the background between the hand and the body.

 Yehaa, we're done with the background. Now we will fix the shoulder part.
Step 5
Now we'll using Polygonal Lasso Tool to create a duplicate of the left shoulder. Draw the outline at the shoulder and right click, choose Make Selection and go to Layer > New > Layer via Copy. Rename the layer as 'Right Shoulder'.


Step 6
Then, flip the Right Shoulder layer to horizontal. Edit > Transform Points > Flip Horizontal

After that, place the Right Shoulder layer on the right position. Rotate the Right Shoulder layer a little bit by clicking [CTRL] + [T] (win) or Edit > Free Transform Points.

Erase the unnecessary things on the Right Shoulder layer using the Erase Tool.

Step 7
As you can see, the tone of the hand is still not nice, correct it with Brightness/Contrast tool. [Image > Adjustments > Brightness/Contrast]. Just trying the perfect tone, here is mine (not perfect but still good enough). Brightness (-14), Contrast (0).

Step 8
Using the Pen Tool, draw the outline of the bandage (make sure you are selecting Original layer) and Make Selection of it then create a new layer via copy [Layer > New > Layer via Copy]. Rename the layer as "Bandage", move the layer to the top and place it into the right position.

Step 9
Here is the value for the Bandage layer for it Brightness and Contrast (Image > Adjustments > Brightness/Contrast). Brightness (-13) , Contrast (-15). You can try your own to get the best result!

Step 10
As you can see, the Right Shoulder layer still not very realistic. Touch-up it using Burn Tool

with the setting,

here is the final result
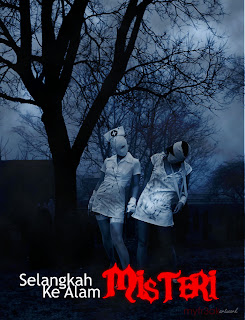
 That's all for now and thanks for reading this tutorial! I'll try to complete the tutorial as soon as possible and this is the image that we'll do.
Click to continue
 Pen Tool (sepang, ehem..ehem..).
Final Result

Original Photo - Here (by thivierr)
Step 1
Click Pen Tool on the toolbar, and make sure you click on the Paths,Add to Path Area (+) just like the image.

Then, draw the outline of the image using Pen Tool.

Step 2
Here is result when you're finish drawing the outline of the image.

Right click on the image (still with your Pen Tool), click Make Selection

and here is the result of the action (make selection).

Step 3
Create a new layer of the selection image. Go to Layer > New > Layer via Copy

After put white background behind the layer that we've create and hide the original layer, this is the result.

Yes, it still not perfect right? As you can see, the should of the right ladies still covering by black coat and we'll fix it later.
Step 4
With the same technique, remove the background between the hand and the body.


Step 5
Now we'll using Polygonal Lasso Tool to create a duplicate of the left shoulder. Draw the outline at the shoulder and right click, choose Make Selection and go to Layer > New > Layer via Copy. Rename the layer as 'Right Shoulder'.


Step 6
Then, flip the Right Shoulder layer to horizontal. Edit > Transform Points > Flip Horizontal

After that, place the Right Shoulder layer on the right position. Rotate the Right Shoulder layer a little bit by clicking [CTRL] + [T] (win) or Edit > Free Transform Points.

Erase the unnecessary things on the Right Shoulder layer using the Erase Tool.

Step 7
As you can see, the tone of the hand is still not nice, correct it with Brightness/Contrast tool. [Image > Adjustments > Brightness/Contrast]. Just trying the perfect tone, here is mine (not perfect but still good enough). Brightness (-14), Contrast (0).

Step 8
Using the Pen Tool, draw the outline of the bandage (make sure you are selecting Original layer) and Make Selection of it then create a new layer via copy [Layer > New > Layer via Copy]. Rename the layer as "Bandage", move the layer to the top and place it into the right position.

Step 9
Here is the value for the Bandage layer for it Brightness and Contrast (Image > Adjustments > Brightness/Contrast). Brightness (-13) , Contrast (-15). You can try your own to get the best result!

Step 10
As you can see, the Right Shoulder layer still not very realistic. Touch-up it using Burn Tool

with the setting,

here is the final result


Click
to continue