Showing posts with label CSS. Show all posts
24 April 2009 | 0 comments

Blog Diserang Makhluk Aneh!

Salam & Hi semua!


Korang ada perasan tak dua ekor makhluk yang sedang bertenggek kat blog mf ni? Hehe, yang baru biru adalah pemilik blog dan yang kanan tu, si sepang. Korang nak letak dalam blog korang pun boleh je, korang potong gambar korang pakai Pen Tool dalam Photoshop, buang background belakang, simpankan gambar itu .png.

Lepas tu, korang bermain-lah dengan CSS, contohnya, macam mf punya:-


untuk margin tu, eksperimen je tu, yang z-index tu, nak bagi layer gambar tadi diatas sekali. Tetapi malang sekali, Google Chrome dengan Safari 4 tak support z-index (ia berfungsi dengan baik untuk IE8, Firefox 3). Mungkin ia akan muncul hanya dengan memanggil javascript seperti adiwidget punya.


05 March 2009 | 17 comments

Sharing is Caring, but Ripping is Fucking~

Labels: , ,
Assalamualaikum semua!

Malam ni mood aku agak unstable, maybe sebab pressure dengan test dan jugak ada 1 menda yang agak melucukan + menggeramkan (menggeletar aku punya geram, selamat ada sepang..ayat dia rileks ja - "SanG sEpanG: ko ckp jea.. knwldge is power, but sharing caring not 4 mtherfucker").

Korang ade baca tak tutorial pasal Customize embedded video tu? Bukan ape, bukan la berkira @ kedekut, tapi sekurang-kurangnya, takyah la ngaku kau tu hebat kalau takat rip barang orang (teringat aku zaman IRC dulu dan mungkin mamat ni tak tau apa erti ripper tu).

thE fReAk (3/5/2009 1:13:03 AM): /*+++++++ Youtube Css ++++++++++*/ .v { width:463px; height:372px;margin:50px;padding:auto; } .vtop { background:url(http://i172.photobucket.com/albums/w38/black_parade_goth/vtop.png) center no-repeat;height:17px; } .vbg { background:url(http://i172.photobucket.com/albums/w38/black_parade_goth/vcenter.png) center repeat-y;padding-left:15px;padding-bottom:5px;} .vbottom { background:url(http://i172.photobucket.com/albums/w38/black_parade_goth/vbottom.png) center no-repeat;height:19px; }
thE fReAk (3/5/2009 1:13:15 AM): camni kata "saya terer html/css"?
***_******** (3/5/2009 1:13:33 AM): kote
thE fReAk (3/5/2009 1:13:36 AM): kasi simpann laaa
***_******** (3/5/2009 1:13:39 AM): ako dapat kode
thE fReAk (3/5/2009 1:13:43 AM): butuh
***_******** (3/5/2009 1:13:44 AM): bukan kt ang
thE fReAk (3/5/2009 1:13:45 AM): aku buat sendiri
thE fReAk (3/5/2009 1:13:53 AM): aku tau la code aku
***_******** (3/5/2009 1:14:06 AM): ang tgk dari mula kode ako tuh
------------------------------------------------------------------------
thE fReAk (3/5/2009 1:15:11 AM): apa beza?
***_******** (3/5/2009 1:15:12 AM): margin right
thE fReAk (3/5/2009 1:15:18 AM): margin dengan padding
***_******** (3/5/2009 1:15:20 AM): pa
thE fReAk (3/5/2009 1:15:21 AM): tu ja aku tanya
***_******** (3/5/2009 1:15:25 AM): tuh tepi skali
***_******** (3/5/2009 1:15:30 AM): rad tuh
***_******** (3/5/2009 1:15:31 AM): pad
***_******** (3/5/2009 1:15:33 AM): tuh
***_******** (3/5/2009 1:15:37 AM): tepi skali
***_******** (3/5/2009 1:15:41 AM): margin
***_******** (3/5/2009 1:15:44 AM): jarak ckit
-------------------------------------------------------------------------
***_******** (3/5/2009 1:19:23 AM): ang rip 


1. Bukan dari aku? Awat class dengan comment untuk css tu sama ja.
Info Bengap:
class = .v {}, .vbottom {}, .vtop {}, .vb {}
comment = /*+++++++ Youtube Css ++++++++++*/

2. Apa beza Margin dan Padding?
Info Bengap:
Yaka? Padding tepi skali? Margin jarak sikit?
Google~ Tolong ajar jab budak bengap ni!

3. Aik? Aku pulak rip?
Aku rip? Hahahaha, bukan nak berlagak la, tapi untuk pengetahuan ko, aku habiskan dekat sejam lebih (aku sedar aku noob) untuk adjust css kasi perfect + cross-browser (safari/mozilla firefox/IE 7). Image tu pun aku potong sendiri.

Info Bengap:
Kalau ko nak rip pun, tukar la filename, class dengan comment tu. Then ngaku sendiri punya. Tak salah pun ~

Kepada budak bengap yang mengaku webmaster kepada 2 laman web, memang aku tak respect kau! Pegi mampos sama kau~ Bukanlah sombong, tapi nak kasi ko tu sedar diri sikit!

p/s: Aku bukan macam ko, hebat css/xhtml/photoshop/illustrator/javascript (pengakuan oleh seorang rippers). Tapi, sekurang-kurangnya, aku belajar dan sedar diri ;) kalau takat pakai barang orang, then nak bangga, pegi balikk laaa ~ Ape aku heran.. Wahaha


24 February 2009 | 5 comments

Customize Your Embedded Video with Photoshop/CSS

Labels: , ,
Hello there, for this post, I would like to teach you "How to customize your embedded Youtube video in your blog".

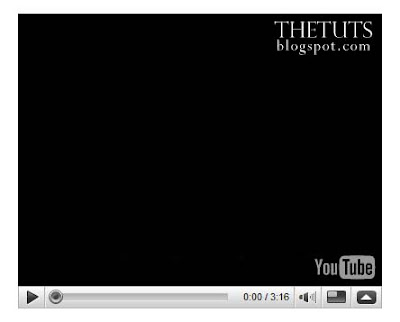
When you put the embedded video such as Youtube video, the player just like this:


How to change the player to become this:


Step 1: Identify

Here is the code that you can copy on the right panel from Youtube.


The main part of the modification is the size of player.

width: 480px
height: 295px

Step 2: Photoshop part

Step 2.1
Create a New Document with width 530px and for the height is 345px to make the layout for our new player layout (increase the size to 50px or higher for the shadow).


Step 2.2
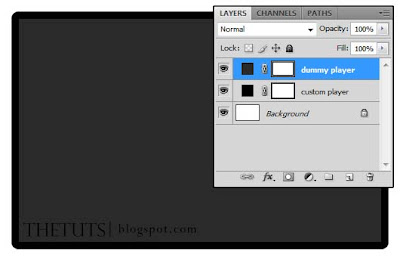
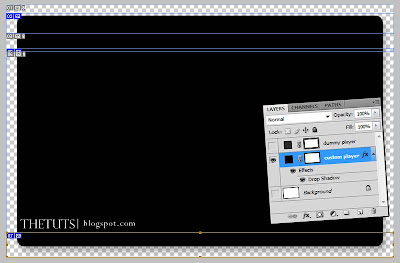
Create the dummy player for Youtube Player with the original size. Click on "Rectangle Tool (U)" and set the fixed size with the original player size (width= 480px, height = 295px). Choose "Grey" color for the foreground and click anywhere in your document. Place the "dummy player" at the center of the document.


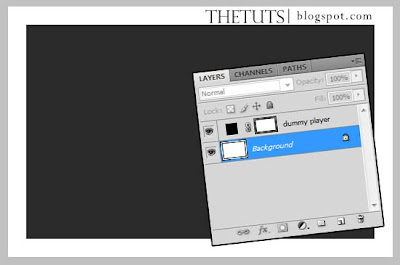
Rename the rectangle to "dummy player" to make your work become more easier.
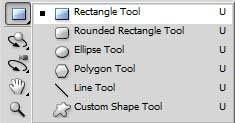
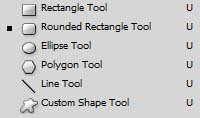
Step 2.3
To make our own player, click "Rounded Rectangle Tool (U)", set the radius to 10px and choose "black" for the foreground. Click anywhere in your document and place it behind the "dummy player". Name it as "custom player".


Step 2.4
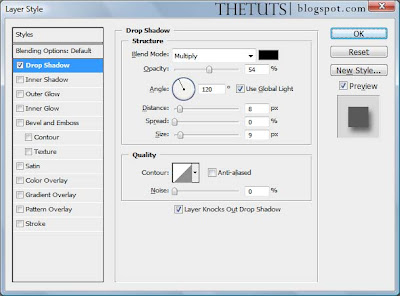
Right click "custom player" in the Layers Panel, select "Blending Options" and choose "Drop Shadow". Just follow this setting.


Step 2.5
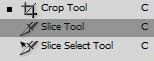
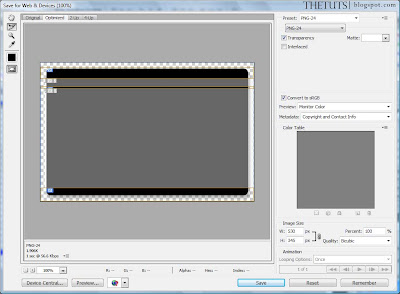
Here come the tricky part. "Invisible" the "dummy player" layer and the background layer, then, take a "Slice Tool (C)" and cut to 3 slices (top, center and bottom).


Step 2.6
When you're done with your slicing, go to "File > Save for Web and Devices". Press "Shift" and click "top, center and bottom" slice. Save it with "PNG-24"


Okay, we're done with photoshop.

Step 3: CSS

Step 3.1:
Html


Explaination

v = the div for the player
vtop = load the top image
vbg = load for the center image and it repeating the horizontal
vbottom = load the bottom image

Step 3.2: CSS


Explaination

.v = we set the width for the player is 540px, and 372px for the height. Margin, Padding = Auto.
.vtop = load the top image called "top.png" and set the height for it or the image can't see.
.vbg = load "center.png" and keep it repeat-y (no need to set the height).
.vbottom = load "bottom.png", and set the height to the image size.

and here is your final result.


p/s: try our player with cross-browser, to avoid some 'craps' annoying the our visitor (I'm not a css expert, I still on learning process).

download the image here.