17 June 2009 |
10
comments
Photoshop Tutorial: Cut Out using Pen Tool
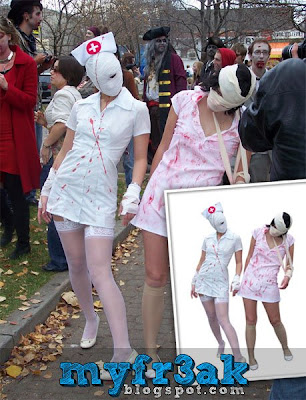
Hi all, actually this is the part of the tutorial how to make this image that i'll post in TheTuts. How to cut a photo using the  Pen Tool (sepang, ehem..ehem..).
Final Result

Original Photo - Here (by thivierr)
Step 1
Click Pen Tool on the toolbar, and make sure you click on the Paths,Add to Path Area (+) just like the image.
Then, draw the outline of the image using Pen Tool.
Step 2
Here is result when you're finish drawing the outline of the image.
Right click on the image (still with your Pen Tool), click Make Selection
and here is the result of the action (make selection).
Step 3
Create a new layer of the selection image. Go to Layer > New > Layer via Copy
After put white background behind the layer that we've create and hide the original layer, this is the result.
Yes, it still not perfect right? As you can see, the should of the right ladies still covering by black coat and we'll fix it later.
Step 4
With the same technique, remove the background between the hand and the body.
Yehaa, we're done with the background. Now we will fix the shoulder part.
Step 5
Now we'll using Polygonal Lasso Tool to create a duplicate of the left shoulder. Draw the outline at the shoulder and right click, choose Make Selection and go to Layer > New > Layer via Copy. Rename the layer as 'Right Shoulder'.
Step 6
Then, flip the Right Shoulder layer to horizontal. Edit > Transform Points > Flip Horizontal
After that, place the Right Shoulder layer on the right position. Rotate the Right Shoulder layer a little bit by clicking [CTRL] + [T] (win) or Edit > Free Transform Points.
Erase the unnecessary things on the Right Shoulder layer using the Erase Tool.
Step 7
As you can see, the tone of the hand is still not nice, correct it with Brightness/Contrast tool. [Image > Adjustments > Brightness/Contrast]. Just trying the perfect tone, here is mine (not perfect but still good enough). Brightness (-14), Contrast (0).
Step 8
Using the Pen Tool, draw the outline of the bandage (make sure you are selecting Original layer) and Make Selection of it then create a new layer via copy [Layer > New > Layer via Copy]. Rename the layer as "Bandage", move the layer to the top and place it into the right position.
Step 9
Here is the value for the Bandage layer for it Brightness and Contrast (Image > Adjustments > Brightness/Contrast). Brightness (-13) , Contrast (-15). You can try your own to get the best result!
Step 10
As you can see, the Right Shoulder layer still not very realistic. Touch-up it using Burn Tool
with the setting,
here is the final result
That's all for now and thanks for reading this tutorial! I'll try to complete the tutorial as soon as possible and this is the image that we'll do.

Click to continue
 Pen Tool (sepang, ehem..ehem..).
Final Result

Original Photo - Here (by thivierr)
Step 1
Click Pen Tool on the toolbar, and make sure you click on the Paths,Add to Path Area (+) just like the image.
Then, draw the outline of the image using Pen Tool.
Step 2
Here is result when you're finish drawing the outline of the image.
Right click on the image (still with your Pen Tool), click Make Selection
and here is the result of the action (make selection).
Step 3
Create a new layer of the selection image. Go to Layer > New > Layer via Copy
After put white background behind the layer that we've create and hide the original layer, this is the result.
Yes, it still not perfect right? As you can see, the should of the right ladies still covering by black coat and we'll fix it later.
Step 4
With the same technique, remove the background between the hand and the body.
Yehaa, we're done with the background. Now we will fix the shoulder part.
Step 5
Now we'll using Polygonal Lasso Tool to create a duplicate of the left shoulder. Draw the outline at the shoulder and right click, choose Make Selection and go to Layer > New > Layer via Copy. Rename the layer as 'Right Shoulder'.
Step 6
Then, flip the Right Shoulder layer to horizontal. Edit > Transform Points > Flip Horizontal
After that, place the Right Shoulder layer on the right position. Rotate the Right Shoulder layer a little bit by clicking [CTRL] + [T] (win) or Edit > Free Transform Points.
Erase the unnecessary things on the Right Shoulder layer using the Erase Tool.
Step 7
As you can see, the tone of the hand is still not nice, correct it with Brightness/Contrast tool. [Image > Adjustments > Brightness/Contrast]. Just trying the perfect tone, here is mine (not perfect but still good enough). Brightness (-14), Contrast (0).
Step 8
Using the Pen Tool, draw the outline of the bandage (make sure you are selecting Original layer) and Make Selection of it then create a new layer via copy [Layer > New > Layer via Copy]. Rename the layer as "Bandage", move the layer to the top and place it into the right position.
Step 9
Here is the value for the Bandage layer for it Brightness and Contrast (Image > Adjustments > Brightness/Contrast). Brightness (-13) , Contrast (-15). You can try your own to get the best result!
Step 10
As you can see, the Right Shoulder layer still not very realistic. Touch-up it using Burn Tool
with the setting,
here is the final result
That's all for now and thanks for reading this tutorial! I'll try to complete the tutorial as soon as possible and this is the image that we'll do.

Click
 to continue


Terdapat 10 komen. Sudilah tinggalkan komen anda.
Luth Textile
waaa... i like..
cun la ek.. hihi..
monsterbuzz
wow! cool!
love this tutorial! this is the skill that i can't do it perfectly. there's always something wrong with the outline of the figure that had been cut. uh T_T
unknown
teknik ni yg aku nk bljr slami ni
tp x pas2 lg nk bt mcm mn sbb x reti
thnx 4 da post =)
Eddie
Aku ust nak tanya. apa kelebihan untuk crop guna pen tool ni berbanding guna lasso tool? bukan guna lasso lagi senang ke kalau untuk selection area ni?
y
luth > ni baru potong2, utk bab seterusnya lambat lagi la..saket otak sudaa pikir projek..
monsterbuzz > try read Photoshop’s Pen Tool: The Comprehensive Guide at psdtuts. It's very useful tutorial, learning How to Handle Pen Tool
khairil > aku pun tak la terer sangat, lagipun ini cara yang paling lambat (kot) untuk cut-out gambar. But I love the quality berbanding tool-tool yang lain..
Eddie > utk orang yang tangan yang terketar macam hamba ni, Pen Tool la yang sesuai kot, tapi kalau tangan cun, banyak lagi skill boleh pakai untuk crop gambar, contohnya pakai "color range", "lasso tool", "extract" dalam Photoshop CS3 dan ada lagi beberapa plug-in yang boleh pakai untuk crop gambar.
Enchek Sepang
seram2.. intermediate :P
y
xde la intermediate sangat, just lebih remeh tapi detail la..
Amoi
aku lagi suke pakai eraser tools or quick mask utk potong gbr^^
mario
wow..serously job well done..
love it!
y
Thanks all :D
Post a Comment
Sila gunakan bahasa yang sesuai dan iklan tidak dibenarkan disini
Please use appropriate language and NEVER advertise here.